Welcome back! Spring is fast approaching. The weather in Kansas is too cold for gardening, but it’s the perfect time to start seeds indoors.
I found a nice planting calendar online. The website is called Seedtime. You create a free account, enter your hardiness zone, then enter your crops for the year.
The website breaks down all the tasks for you: when to start seeds, when to transplant, when to harvest, etc. The website is still under development, so there’s some wonkiness, but so far… I like it!
Here is my “invite friends” link: https://seedtime.us/jkmel4ukl4tonac09iap-5fs?ref=kristy-34
You do need an invitation link, like the one above. Otherwise, the website puts you on a wait list.

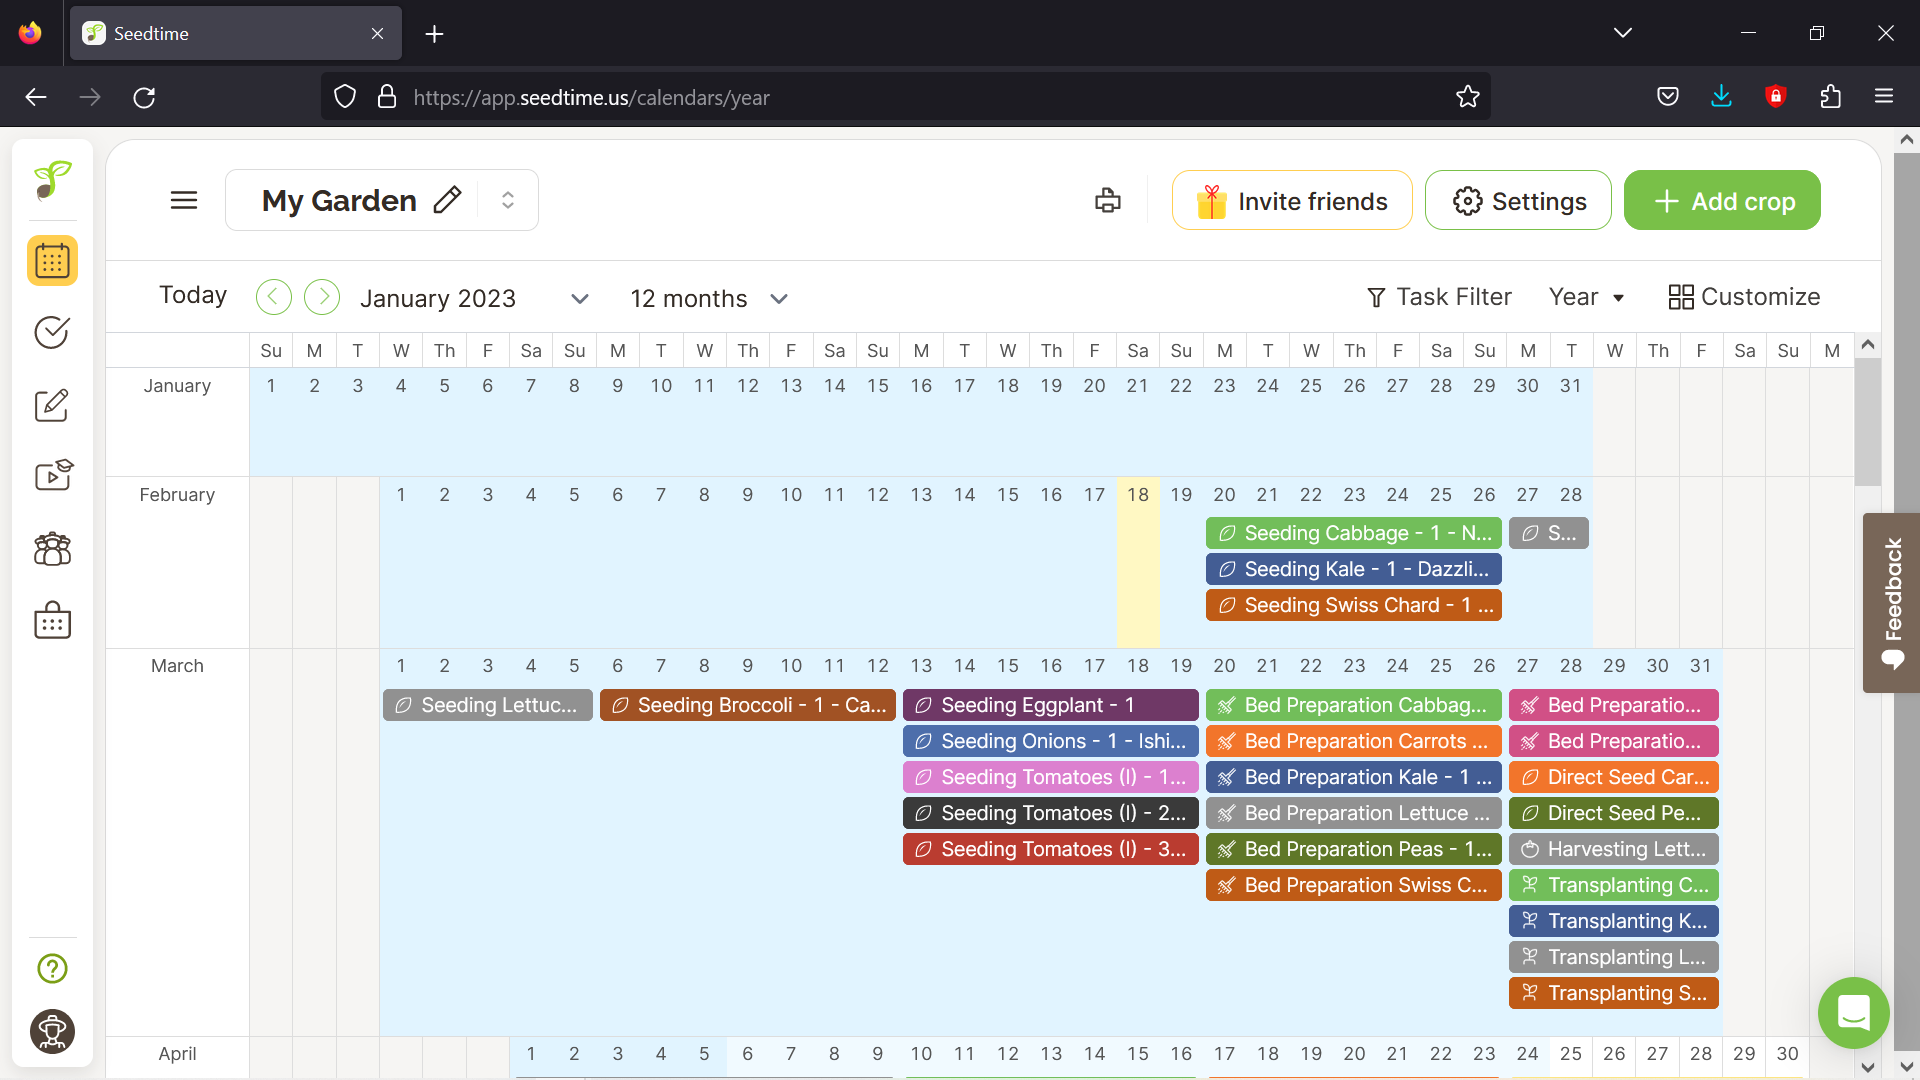
Here is my Seedtime calendar for 2023! I’m located in zone 6A. It says I should start seeds for cabbage, kale, and swiss chard this weekend. In two weeks, I can start seeds for lettuce and broccoli.
There is some discrepancy. For example, in Kansas you should plant potatoes outside on St. Patrick’s Day (mid-March), but the calendar wants me to plant in April instead.
So, not perfect… but gives you a general idea of when to do things.
(Update: Nevermind, I discovered you can toggle the “seed indoors” or “sow outside” setting for crops, which adjusts the calendar.)

Here is the menu for adding crops. You select the crop, then must select the variety. You cannot add new varieties using the free version, but I found most of the varieties for my veggies.
You can select the color and add a location label, too.

Here are my seeds for the weekend. Swiss chard, Chinese cabbage, and kale. All three seeds are from Baker Creek. I had success with swiss chard and kale last year, but the Chinese cabbage is new.
I’m hoping the colder weather will lead to a better harvest.
I planted them too late last year. They struggled in the warm weather.

A new seedling starter tray! I found this at my local hardware store. It’s the Jiffy brand. It has a watering tray on the bottom, and the seedlings stay watered for up to 10 days. Much better than watering every day. It comes with a lid, so it’s like a mini green house.


It has instructions inside and outside the cardboard label.
The inside instructions explain the watering tray. The outside instructions explain how to water the dirt pellets and plant your seeds.


Here’s a look inside the tray. Instructions said to flip over the black plastic layer, which allows water to flow beneath.
It comes with a nice wicking cloth. It feels like fleece or wool fabric. Wicking cloths are common for watering seedlings. The fabric absorbs water from below, then provides steady moisture for the soil pellets above.
Nice way to water without drowning seeds.

Add the tray of pellets on top of the wicking cloth. Pour water into the corner of the tray.
For starting out, instructions said to slowly add 12 cups of water… also known as 2.8 liters… or approximately 3/4 of a gallon.
I like this method. You pour water once and in one location, then it waters all of the seeds, and the dirt pellets don’t lose form. I had that trouble last year.

I walked away for an hour while the pellets absorbed water. After coming back, the dirt pellets grew by an inch and were ready for planting.
I used a tooth pick to expand the mesh opening above, then to dig a shallow hole in the center. Note: When transplanting later outside, do remove the mesh completely, or your plants can become rootbound.
People say you should plant 2-3 seeds per hole to ensure germination. I’m going to try one seed per pellet. Because last year I had too many sprouts, then didn’t have the heart to rip out the extras.
On the side of the plastic container, I used a dry erase marker to write the initials of the plants: swiss chard, cabbage, and kale.

Done! Put the lid on top, but don’t close all the way. Not shown in this photo, but place the lid askew to allow airflow.
The lid helps retain warmth and moisture, which seeds like for germination. After most of the seeds sprout, remove the lid completely.

By the way, Ian made these great frames for our plant lights! Last year was a struggle because the lights hung from the peg board on the wall.
Now the lights hang directly overhead. Nice!

Here is the original design from the whiteboard on our fridge. Drawn by yours truly.

The inner frame has nails spaced out at one-inch increments. So, the light can go up or down accordingly.

Looks cool. Now I can fit a lot of plant trays under the lights. All ready to go for spring!
Leave a Reply